Before I recently moved to my new apartment, I had no idea how I was going to get everything over. Being in the middle of end-of-semester stress, I didn’t have time or energy to think about logistics. I kind of just hoped it would work out somehow. Because that’s how responsible people operate, right? Just fail to plan and keep your fingers crossed that something will come along. It’s exhilarating! (←lies)
Lo and behold, I have some pretty darn amazing people in my life. Alex and her family helped me load and transport my larger pieces using the U-Haul they had rented. They were literally heaven-sent! I couldn’t have made it without them. Furniture moved, I now had to bring over all the “things” I left behind. I didn’t have my bike yet, so I thought briefly about walking stuff over. I estimated I could finish within a week, if I never slept or took any breaks. The appeal factor for this plan was dismal. Luckily, Tommy (ZipCar member) and Dave came to my rescue. I packed up my stuff in bags and boxes, and we transported it to the new apartment… only to find that the elevator was broken.
And of course my new place is on the top floor.
Much laughter ensued as we carried everything up all four flights of stairs. And by “we” I mean “the boys,” because while I was carrying things like lamps and pillows, they were competing to see who could carry the most weight – and I’m pretty good at packing things to be obnoxiously heavy (hey! I wasn’t thinking that the elevator would break!).
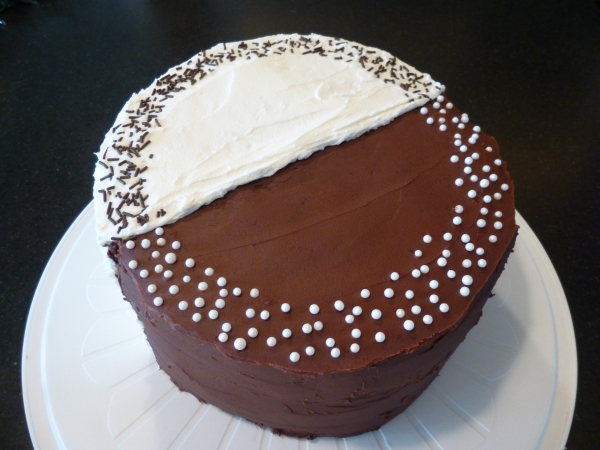
In addition to a much-deserved dinner and drinks, I promised the boys a cake for all their assistance. Plus, it’d be perfect because Tommy could come back (with Erika!) and see the place once it was all set up and pretty. I got the requests (Tommy likes chocolate; Erika likes white cake; Dave was down for anything) and put them together to create this:
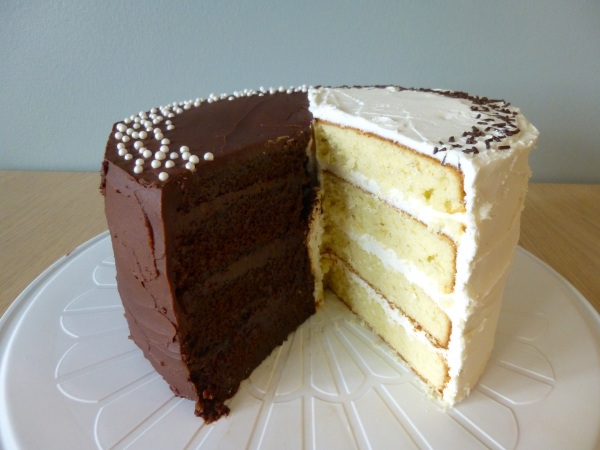
Lest you think I simply frosted this cake to be half buttercream and half chocolate frosting, please observe the complete division of flavors:
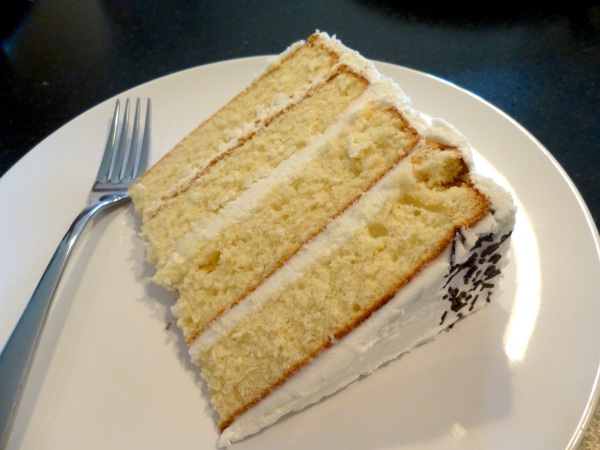
Yes, this is a cake that is literally half chocolate and half plain white. Yes, I did eat two pieces. Naturally. Who wouldn’t?! You have to try both sides! This cake was a solid winner, although we could barely get through the slices. You see, Erika works in a fancy bakery and is therefore extraordinarily talented at cutting slices. Not just any slices, but thick, decadent works of art. Evidence:
Can I please never be in charge of cutting my own cakes ever again? Erika, you are officially hired! Pay will consist of cake slices, and you’ll have to cut them yourself, but hot damn look at how pretty that is…
We mostly all agreed that, while both halves were delicious, the chocolate cake wins because it’s so over-the-top rich and moist. In fact, I’m tempted to make an entire cake of the chocolate side, because the “frosting” is more like a rich fudge ganache that blends seamlessly together with the cake to provide a death-by-chocolate sort of experience. That is not to say the white cake side wasn’t good; it was soft and delicate as white cakes are, and the buttercream tastes like sugary goodness. But I accidentally overcooked the cake (still adjusting to the new oven and I’m convinced it runs too hot), so it bordered on being too dry. Watch your baking times carefully, and you’ll be sure to impress with a cake that pleases both sides of the chocolate vs. plain cake war!
Finally, before I get to the recipe, some notes about orchestrating the creation of this masterpiece without taking all day:
- I recommend making the chocolate cake first; while it’s in the oven, make the chocolate frosting. This goes in the fridge to harden up.
- When your chocolate cakes come out of the oven, let them cool for at least 10 minutes before inverting them onto a cooling rack. Wash up your cake pans (if you don’t have four; if you have four pans, you can make the white cake while the chocolate one is in the oven) and get them ready for your white cakes.
- Make the white cakes and pop them in the oven. While they are cooking, put the chocolate cakes in the freezer and give the chocolate frosting a stir to make sure it’s cooling evenly. This is good time to tidy up the kitchen, because it probably looks like a science experiment gone wrong at this point in the process.
- When the white cakes come out, let them cool for about 10 minutes and then move them to wire rack and put them in the fridge to cool off a bit (they’re studier than the chocolate cake, so they don’t need to be placed in the freezer). Prepare your cake stand (put down strips of wax paper in a circle that you can remove after decorating – this prevents frosting and crumbs from getting all over your stand).
- Make the buttercream frosting. Remove the white cakes and cut them in half. Stack these, alternating cake layers with buttercream frosting. When the cake is fully stacked, slather the flat, cut side with a thick wall of buttercream (if the buttercream has “dried” a bit by this point, blend in some extra butter (softened) or milk to make it “sticky” again).
- Remove the chocolate cake and frosting. Stack these, pushing them against the wall of buttercream as you go. Alternate cake layers with chocolate frosting. You’ll have to cut the last half-circle so that it’s even with the white cake side (you don’t want your cake to be too lopsided!).
- Put the cake (now with the white and chocolate cake halves stuck together, but no frosting on the outside) in the fridge for 10 minutes.
- Remove the cake. Frost the chocolate side with the chocolate frosting, then frost the white side with the buttercream frosting (the buttercream is easier to work with and is thicker than the chocolate frosting, so it should go on second).
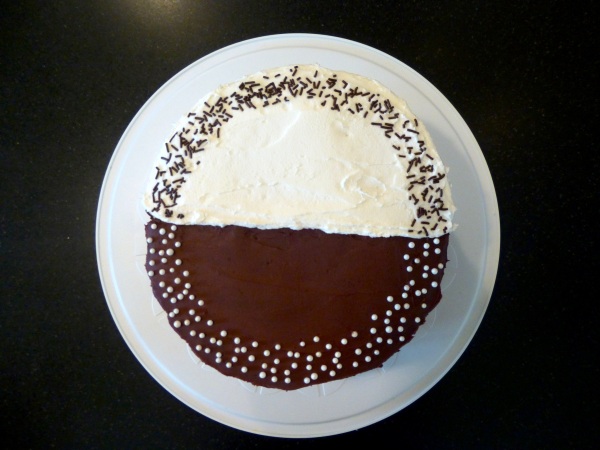
- Finish off with any decorations! I used white and brown sprinkles on opposite sides of the cake to tie it together, but feel free to get creative!
~~~~~~~~~~~~~~~~~~~~~~~~~~~~~~~~~~~~~~~~~
BLACK AND WHITE CAKE
For the chocolate cake:
From Smitten Kitchen, originally from Sky High: Irresistible Triple-Layer Cakes
2 cups all-purpose flour
2 1/2 cups sugar
3/4 cup unsweetened cocoa powder
2 tsp. baking soda
1 tsp. salt
1 cup vegetable oil
1 cup sour cream
1 1/2 cups water
2 tbsp. distilled white vinegar
1 tsp. vanilla extract
2 large eggs
For the chocolate frosting (but really more like fudge ganache):
12 oz. bittersweet or semisweet chocolate, chopped
3 tbsp. light corn syrup
4 1/2 tbsp. unsalted butter
1 1/2 cup heavy cream
For the white cake:
Adapted slightly from Group Recipes
1 cup + 1 tbsp. unsalted butter, softened
2 cups granulated sugar
6 large eggs
2 tsp. vanilla extract
2 1/2 cups all-purpose flour
1 tsp. baking powder
2 tbsp. milk
For the buttercream frosting:
1 cup (2 sticks) salted butter, softened
1-2 tsp. vanilla extract
1-2 tbsp. heavy cream
3-5 cups powdered sugar
(Sorry I don’t have better estimates on these, I basically just combine things until I like the taste and consistency!)
~~~~~~~~~~~~~~~~~~~~~~~~~~~~~~~~~~~~~~~~~
Make the chocolate cake:
1. Preheat the oven to 350 degrees F. Grease the bottoms and sides of two 9-inch round cake pans. Cut out a circle of parchment or waxed paper and line the bottom of each pan; grease the paper. Set aside.
2. In a large bowl, whisk together the flour, sugar, cocoa powder, baking soda, and salt. Add the oil and sour cream; whisk to blend. Gradually beat in the water. Blend in the vinegar and vanilla. Whisk in the eggs and beat until well blended. Scrape down the sides of the bowl and be sure the batter is well-mixed. Pour into the prepared cake pans, dividing evenly.
3. Bake for 30-35 minutes, or until a toothpick inserted in the center comes out almost clean. Let cool in the pans for 10-20 minutes. Invert onto wire racks, carefully peel off the paper liners, and let cool completely. Like Deb notes, these cakes are incredibly delicate. Put them in the freezer for half an hour to make your life infinitely easier. In fact, it’s going to be essentially impossible for you to make a layer cake out of these cakes if you don’t firm them up in the freezer. They’ll defrost once assembled, don’t worry.
Make the chocolate frosting/ganache:
Place the chopped chocolate in a bowl with the corn syrup and butter. Heat the cream just until it begins to boil. Remove from the heat and pour over the chocolate. Let stand for 1 minute, then stir until smooth. Chill thoroughly in the refrigerator or freezer until firm enough for decorating. (Mine took about 2+ hours to thicken up satisfactorily.)
Make the white cake:
1. Your oven should already be at 350 degrees F, but if you are doing this at a later time, preheat it now. Grease the bottoms and sides of two 9-inch round cake pans. Set aside.
2. In a large bowl, cream together the butter and sugar. Beat in the eggs, two at a time, and then stir in the vanilla.
3. Combine the flour and baking powder in a separate bowl and then gradually add to the creamed mixture until well-mixed. Blend in the milk.
4. Pour into the prepared cake pans, dividing evenly. Bake for 30-40 minutes (the recipe calls for 40-45; mine were done at 30 – it just depends on your oven, and I’m still adjusting to our new one), or until a toothpick inserted in the center comes out just barely clean. Let cool in the pans for 10-20 minutes. Invert onto wire racks and let cool completely. Put them in the fridge to cool even faster.
Make the buttercream frosting:
In a stand mixer, beat together 1 cup of the sugar and softened butter. Mix on low speed until well blended, gradually adding the rest of the sugar. Increase speed to medium and beat for another 3 minutes. Add vanilla extract and cream; continue to beat on medium for 1 minute more, adding extra cream or powdered sugar to reach a spreading consistency. (I used a hand mixer this time because I moved to a new place and won’t have a stand mixer until I can ship mine over from California; it worked just fine, but the frosting was a bit thicker and less fluffy than I would prefer. That’s the magic that only a stand mixer can bring!)
Assemble everything:
1. Starting with the white cakes, cut them in half so you have four half circles. Stack them, alternating cake layers with buttercream frosting. When the cake is fully stacked, slather the flat, cut side with a thick wall of buttercream (if the buttercream has dried a bit by this point, blend in some extra butter (softened) or milk to make it “sticky” again).
2. Next, work with the chocolate cake. Cut them into half circles, and stack them, alternating cake with frosting. This time, though, push each layer against the wall of buttercream as you go. You’ll have to cut the last half-circle so that it’s even with the white cake side (you don’t want your cake to be too lopsided!).
3. Put the cake (now with the white and chocolate cake halves stuck together, but no frosting on the outside) in the fridge for at least 10 minutes. Remove and frost the chocolate side with the chocolate frosting, then the white side with the buttercream frosting (the buttercream is easier to work with and is thicker than the chocolate frosting, so it should go on second). Finish off with any decorations you like. I used white and brown sprinkles on opposite sides of the cake to tie it together, but feel free to get creative!


I chose this recipe because I had 3 granddaughters visiting me and two only like chocolate cake and one only liked white cake. I must say I was disappointed in the recipe. The chocolate cake batter was very runny (even with 1/2 cup less water than th recipe called for) so it rose quite well in the oven but then collapsed after removing from the oven. I baked it longer than the intended time and it was still very very brownie moist. I loved the chocolate frosting. I added a little more coffee to the frosting and it was more of a mocha frosting. The white cake was way too sweet, both the cake and the frosting. Please advise!!
I’m so sorry for not seeing this — I don’t use this site anymore (life got too busy). I’m sorry to hear you didn’t like the recipe. If you wanted to do something like this again, you could try a different cake recipe for the white one since this one was too sweet for you? Or you could try removing some of the sugar in the recipe (certainly in the frosting, if you don’t like things too sweet, don’t add too much powdered sugar!). The chocolate cake batter is supposed to be extremely runny, but it always bakes up perfectly moist and delicious. I’m sorry again that you didn’t like it! Hopefully you’ve found better recipes for your taste.
Hi,
How do the two sides of the cakes stick together? Doest it fall apart as you cut the slices?
I use buttercream to stick them together: “When the cake is fully stacked, slather the flat, cut side with a thick wall of buttercream (if the buttercream has “dried” a bit by this point, blend in some extra butter (softened) or milk to make it “sticky” again).” It’s been so long since I made this cake, and it was mainly for novelty, that I wasn’t worried about it being the prettiest… I don’t recall it falling apart, though!